- HubPages»
- Technology»
- Internet & the Web»
- Web Page & Web Site Development
How to Move A Wordpress Site


This tutorial will help you move your existing or live Wordpress site (no matter how large) to a new domain name, URL, a new folder, or anywhere else.
This is a scary thing to do, but I think you'll find this rather easy to follow and mostly painless! Lots of screenshots, arrows and other things to help make this task easier are included in the guide.
Moving Wordpress Can Be Scary
...really scary. The first time I did it, I ran into every problem imaginable. I panicked and got really frustrated when my new site had tons of 404's. It took me over an hour to fix and troubleshoot things in mySQL and phpMyAdmin, but thankfully - I wrote everything down and had it well-documented. It was total "tutorial" material, which is what you're about to read!
Let's cut to the chase: you're probably here because either:
- You want to move your Wordpress site to a new folder, such as moving mysite.com to mysite.com/new-location, or,
- You want to move your Wordpress site to an entirely new domain name, such as moving oldsite.com to newsite.com
This can seem like a scary thing to do, and there are definitely numerous things that will have to be double-checked. If you're doing this move for an old, established website - you'll want to make sure that everything has been done correctly, or you'll have a lot of 404 errors and unhappy visitors on your hands!

Moving Wordpress to a New Location
Moving to A New Domain Name, Server or Folder
Here are the steps you'll have to take if you're moving a Wordpress site to a location (it doesn't matter if it's to a new domain name or just to another folder on the existing domain name).
The basic steps you'll need to take will be to install a fresh copy of Wordpress on the new location, move the old database files over to the new database, and manually find and replace all instances where the old website was being referenced in the database so that they point to the new location.
1- Install Wordpress In the New Location
- If you're moving Wordpress to a new domain name:
Create your new domain name's account on the server.
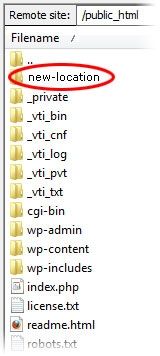
- If you're moving Wordpress to a new folder within the existing domain name: Open your FTP program (I use FileZilla - it's the best free one out there), create the new folder where your existing Wordpress site will be moved to (see the screenshot on the right)
Once that's done, install Wordpress on the new location where you'll be moving your site to. Download the newest version of Wordpress, put all of the installation files into this new folder, then install it using the "Famous 5-minute installation guide."
During this process, you'll have to create a new database for the website. This is done through MySQL, an option in cPanel/WHM.
Create a brand new database as the instructions tell you to do. Don't forget to create a database user, set it to "All Privileges," and then add the database user to the database - this is a commonly overlooked step that will disable you from doing anything from this point forward! Anyway, I'll call this database "mysite_newdatabase" for the sake of this tutorial.
During this part of the tutorial, you're installing Wordpress. However, do NOT proceed with the completion of the Wordpress installation process -- simply go up to the part where you have created a blank new database, and move on with the tutorial from this point forward.
2- Export Old Site Database to Desktop
Now, we're going to save a copy of the old site's database to your desktop (it's good to keep a copy of this somewhere else too - in case something goes horribly wrong!) In order to copy the database, get into your old site's account on the server via cPanel, WMHx or whatever other interface you have:
- Find the area for "phpMyAdmin" and click it.
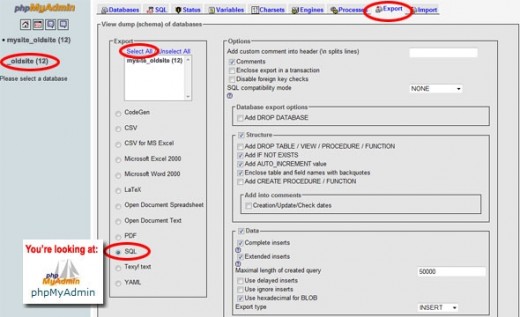
- On the left hand column, click the name of your database (it's usually "_mydatabase") so that it's selected. The number in parenthesis signifies how many tables the database has in it.
- Click the "Export" tab in phpMyAdmin. In the "Export" section near the upper left hand side, click "Select All" so that everything in the box is highlighted.
- Make sure that the "SQL" radio button is selected as an option underneath that (it's usually selected by default).
- Everything else can be left as-is, since the defaults don't need to be changed.
- Lastly, the "Save as file" option at the very bottom of the screen should be checked. For "compression," choose "none." You can rename the file in the provided box called "file name template," or you can simply right click/rename the file once it's on your computer. Regardless, click the "Go" button on the far bottom right, and save the file to your desktop.
Now that your old site's database is saved to your desktop, go ahead and name it to something else. For the sake of this tutorial, I'll call the database "oldsite.sql."
Before continuing on, make sure you've created a blank, new database on the new Wordpress installation before going any further with this tutorial. It is the only way to move a database -- you can't simply upload a database file into PHPMyAdmin.
3- Import Old Site Data Into New Database
Remember the brand new database you created when you installed a fresh copy of Wordpress within the new directory? I called it "mysite_newdatabase" before. Let's go into that database through phpMyAdmin. Log into it as explained above, but choose that new database's name on the left hand column. Now, it's time to import the old files into that new database:
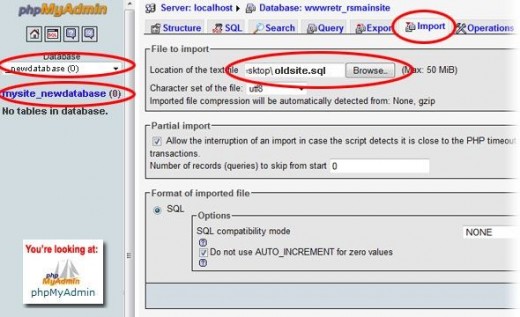
- Make sure that the new database is selected on the left hand column within the drop-down box, and that it has a (0) next to it, signifying that it is empty.
- Click the "import" tab, and click the browse button to locate the old database .sql file that we saved to your desktop before.
- Click the "Go" button. You should now see a message that says:
Import has been successfully finished, 12 queries executed.
"12" is just a number used for this particular example, it will display the number of however many fields your site had. Yours might have hundreds.
4- Find/Replace the Old URL or Domain Name With the New One
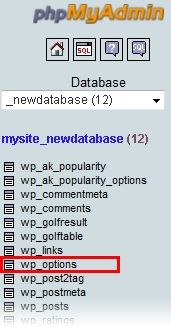
Let's manually edit a couple fields in the database so that the database is using the new domain name or URL of the site you're importing into. First, look for "_options" within the new database, which has just been populated with the old site's data. Click it on the list, which is on the left hand column.
When you click "_options," you'll see a screen that looks kind of like an Excel document, with rows and columns. This screen shows the data inside your database, including your page title, site URL, admin email, and other config data.
Within this table will be a few things you'll have to manually edit, which are still referring to the old URL. So, if you see anything that references "oldsite.com" instead of "newsite.com," you'll want to click the pencil icon in their row (this can be found on the left of the row) and manually type in the correct address on the next screen, then save. Here's a closer look:
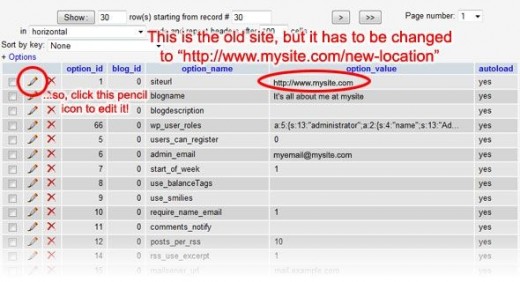
It's pretty self-explanatory: simply edit these old URLs and replace them with the new site's URL. I've found that there are usually only two cases where this has to be edited:
- "option_name: siteurl" (it's usually on the 1st page)
- "option_name: home" (it's usually on the 2nd page)
5- Global "Find and Replace" of Old URL
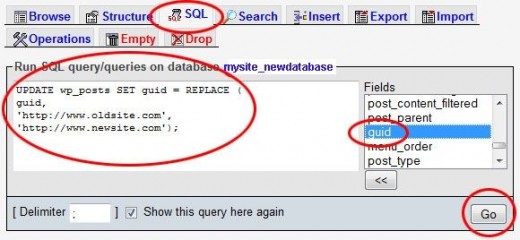
Next up, we'll find and replace all instances of the old URL found in every single Wordpress post. Don't worry though, you can get this done in seconds. Click your database name on the left hand column, once again. When the full list of database fields appears, look for "wp-posts" and click it. Now, click the "SQL" tab at the top of this page.
This section governs every single post on your Wordpress site within the database. If you scroll the screen to the right a little bit, you'll see a column called "guid" which lists the URL of every individual Wordpress post. You'll also notice that they're all referencing the old website, and all of them need to be edited!
Click the "SQL" tab at the top of the screen, and you'll find a section entitled "Run SQL query/queries on database." Select and copy the text inside of this box and delete it, then copy and paste the following directly into that box:
UPDATE wp_posts SET guid = REPLACE (
guid,
'http://www.oldsite.com',
'http://www.newsite.com');
...obviously replacing the "oldsite.com" and "newsite.com" examples I've included with their actual URLs.
Important: if your table prefix is not "wp_" as I've listed in the box above for wp_posts, but is a custom prefix, be sure to fix that or this find/replace attempt will kick back an error message.
This should take care of all of the old URLs. However, the old website name will appear everywhere in your new site, and it may take too long to manually edit every instance -- not to mention, you'll probably miss a few instances of it. Find and replace your old website name with your new website name in all pages, posts, titles and everywhere else on the site.
6- Update the "wp-config.php" File
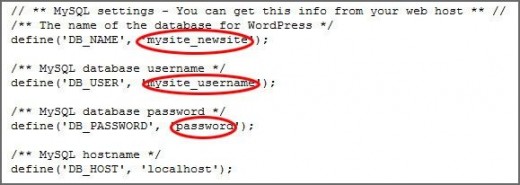
Open your wp-config.php file for the new site, and edit the database name, database username and database user password so that they reflect the correct settings of the new site's database.
- If you're moving Wordpress to a new folder within the existing domain name:
...just remember that you're running a Wordpress installation within a new folder. So, it will have it's own wp-config.php file which only governs the Wordpress installation running inside of that folder!
7- Update URLs Listed In the .htaccess File
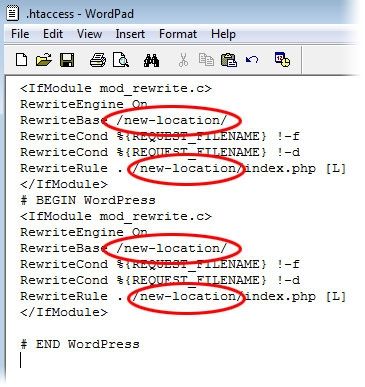
Note: Most people will not have to worry about this step since they've created a new Wordpress installation with a new .htaccess file.
Almost there! Now, it's time to do one more simple but necessary step: open the .htaccess file and make sure that it's referencing the correct URLs. This file is found in your root directory, just locate it through your FTP program, save it to your desktop, and open it in Notepad or Wordpad.
All you have to do here is check to make sure that it is referencing the new address where your new site will be found. A common mistake is to move a website, then visit it only to see a 404 error:
Not Found
The requested URL [whatever the old URL is] was not found on this server.
Additionally, a 404 Not Found error was encountered while trying to use an ErrorDocument to handle the request.
...because the .htaccess is still pointing to the wrong address! A good last step is to log into your new site's admin panel, visit the "Settings/General" area, and make sure that the URLs input in the "Wordpress address (URL)" and "Blog address (URL)" are referencing the new web address and not the old one!
8- Finish the Wordpress Installation Process
Continue on with the process by visiting "www.mysite.com/wp-admin/install.php" (plug in your actual domain name in here, of course). If all of the steps above were performed correctly, you should see your new site with all of the content from the site you've exported it from!
Other Odds & Ends
You'll have to drop in your old Wordpress theme into the /themes folder, or Wordpress will warn you about it. Note that you'll probably have to tweak your theme to remove any elements that reference the old website.
Also, be sure to visit your Wordpress admin section immediately, and change any references to the old website anywhere they appear (such as "site name," "tagline," etc.). You'll also have to install all of the plugins used on the old website in order for the new website to work identically.
"I Did All Of This and It Still Doesn't Work!"
The really frustrating part is when you've done everything, only to see an error message on the live site. Unfortunately, there's no way to pinpoint what the problem is.
Use some logic, though: if the error seems to be database related, make sure you go back into phpMyAdmin and ensure that all traces of the old URL are no longer referenced in the database (click the "search" tab and type in the old URL...anything that pops up as a result should be edited).
Most problems are database ones when it comes to a site move. Otherwise, it may be related to your .htaccess file referencing the old URL, or an improper setting in your Wordpress admin panel.


